Christmas Countdown 2011 - Day 24
31 Sleeps to go
Welcome to day 24 of our 2011 christmas countdown over at Creative Craft World. Today is my turn to show you something festive and I have decided to make some festive sweetie bags for all the children which might visit you over the festive season. I love the traditional themes at christmas which is why I have made them the way I have but you can alter and change colours quite easily. If you have seen my gift tags on day 15 they are very similar as I like things to match.
Step 1: Welcome to day 24 of our 2011 christmas countdown over at Creative Craft World. Today is my turn to show you something festive and I have decided to make some festive sweetie bags for all the children which might visit you over the festive season. I love the traditional themes at christmas which is why I have made them the way I have but you can alter and change colours quite easily. If you have seen my gift tags on day 15 they are very similar as I like things to match.
Supplies Needed:
- Big Shot (or other die cutting machine)
- Spellbinders Nestabilities - Classic Scalloped Circles large & Standard Circles large
- Sizzix Bigz Die with bonus textured impressions - Holly & Berries
- Cardstock - Kraft, White, Green & Red (scraps can be used for these if you have any)
- Length of ribbon
- Adhesive
- Metal Ruler
- Bone Folder
- Clear Card Cello bag in chosen size
- Sweets to fill bags
Using your die cutting machine and scalloped circle die cut chosen size from kraft cardstock. I used the biggest die. Place to one side until ready to use.
With the standard circle die cut a circle from the white cardstock. You can choose whichever size you want but I have used the same size die as I did with the scalloped circle.
Step 3:
With the Kraft circle score and fold in half with a metal rule and bone folder, do exactly the same with the white circle and layer the white circle onto the kraft circle.
Step 4:
On the inside of the circle, stick some strong double sided tape so can attach length of ribbon to create the handle.
Step 5:
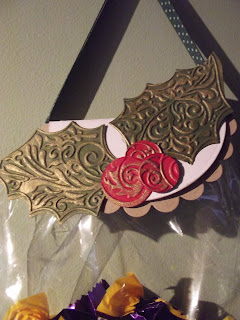
Using your die cutting machine again, use your holly die to cut out the holly design to decorate.
Step 6:
If you choose too, put the holly back through the die cutting machine to emboss the details onto the holly leaves, I chose to do this and then inked the edges and embossed design with gold ink.
Step 7:
Attach the holly and berries onto th top of the bag in your chosen position.
Step 8:
Fill your cello bag with chosen sweets and attach the top onto the bag.
Pop back again tomorrow for another new festive project :)
Lou xx


.JPG)


.JPG)


Super idea, thanks Lou.
ReplyDeleteI never thought of adding ribbon! - what a great idea:) Sarah
ReplyDeleteVery pretty Lou!
ReplyDeleteTrish x